


How to Hang Curtains High & Wide: The 7-Step Designer Guide
INTRODUCTION
The look of any room depends largely on how the curtains are hung. It’s a designer's secret: even expensive curtains can look cheap if hung poorly, but a professional installation makes any curtain look high-end.
A well-executed installation does more than just hold up fabric; it enhances the aesthetics of your space and creates that perfectly polished, put-together look.
So, how do you ensure your drapes look their best? In this guide, we’re giving you a practical, foolproof 7-step routine. You'll learn the professional 'High-and-Wide' method to transform your windows from basic to breathtaking.

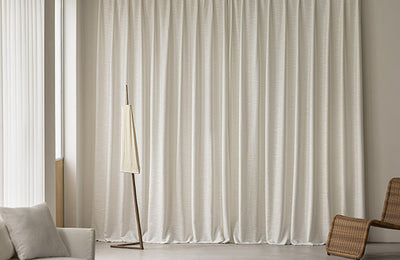
Step 1 - High-And-Wide As The Perfect Designer Trick
Hanging curtains well creates a feel for the space as much as they cover the windows and provide privacy. This is why designers make use of the high-and-wide trick when hanging curtains.
The high method tells you how high to hang curtains. It is usually 4 to 6 inches above the window frame. It creates a dramatic look, making the room's ceiling appear taller than it actually is. For a room with a low ceiling, the curtain rod placement should be very close to the ceiling.
The wide method ensures that the curtain is wider than the window frame. On both sides of the window frame, the curtain rod has to be 6 to 12 inches wider. This is 12 to 24 inches in total for both sides. The curtains cover the wall, making the room appear bigger and more spacious.
The combination of both techniques is what makes the high-and wide method. They make your room appear taller and bigger, thereby making it more comfortable. Remember that the rule of thumb here is the curtain rod should be double the length and width of the actual window frame. Not using this method can make your space appear smaller and leave it unfinished, with a chopped-up look.
Step 2 - Choose A Professional Grade Hardware
You don’t want to focus solely on quality drapes, because you also need professional-grade hardware to ensure your curtains hang properly. Therefore, your choice of hardware must support the weight of high-quality lined drapes. It is to ensure that the rod doesn't sag or fail under the weight of heavy curtains. Quality hardware ensures your curtains glide easily, hang securely, maintain the intended look, and remain durable even with continuous use. The rod must be made of aluminium, steel, or wood, and the window installation must include at least two end brackets, one on each side. To determine the appropriate hardware weight, properly assess your window dimensions and the drapery weight. Heavier fabrics will require stronger hardware.

Different curtains require different hardware options because they vary in weight, strength, and style. Our curtain header guide pairs each header with the hardware required.
Step 3 - Gather Your Tools The Right Way
To produce perfect, finished work, you need the right tools. The right tools required for a curtain installation include:
-
Drill and drill bit: Used to create holes in the wall with the cutting tool attached, which makes the round holes that the screws go into. The drill bits to be used depend on the wall.
-
Tape measure: Used to obtain accurate measurements of width and height.
-
Level: This can be a small or a laser level, used to ensure the rods are straight.
-
Wall Anchors: This is needed to provide a secure hold if you’re hanging heavy curtains
-
Curtain rods: The main hardware required for installation
-
Stud finder: For locating wall studs when working with drywall
-
Pencil: For marking drill and screw locations
-
Bracket: The hardware piece attached to the wall to hang the curtain rod.
-
Bracket screws: used to secure brackets to walls. Always use the right length and type for your wall.
-
Safety tools include ladders, safety goggles, gloves, etc.
With this checklist, you’re well on your way to a complete curtain installation.
Step 4 - Measure Twice And Drill Once
Measurement is key when starting a curtain rod installation, as incorrect measurements can affect the entire process from start to finish.
Step 1: With your tape measure and pencil, measure the height and width you desire and mark the exact points you want to drill holes for the brackets. Use the same measurement for both sides. Our measuring tool also makes your measuring process easier.
Step 2: With the level, make sure your marks are straight before drilling the holes so the rod stays straight. If the bubble in the level is straight, then you’re good.
Step 3: Make tiny pilot holes to guide your drill bit and get straight holes
Hold the drill with both hands to keep it steady, and gradually increase the drilling speed as you go down. Do this gently so you don’t damage your wall.
Always make sure to select the right drill bit, as wood, masonry, and metal bits work with different surfaces. You must measure twice to avoid mistakes.
Step 5 - Securely Install The Brackets
After marking the bracket holes where the screws will go, it is now time to install the brackets. On the brackets, there are holes where screws will go. So, make sure the holes in the bracket sit directly on the pilot holes you have made. The pilot holes ensure there are no misplaced screw holes. Then, with the drill, secure the bracket to the wall with screws.
It is also important for you to have drywall anchors attached to the wall. They provide extra support for the rod so it doesn’t overbear the weight of heavy curtains and pull out from the wall. The anchors also prevent the screws from tearing through the walls and damaging them, thereby saving you repair costs. Overall, drywall anchors help with durability.
Step 6 - Hang Your Curtains
Now, you’re getting to the simpler part, which is also tricky because it determines how the fabric falls. Thread your curtain on the rod. If you have grommet, pleated, or ripplefold headers, attach them as well. Once the curtain is on the rod, lift the rod carefully and place it into the brackets. You might need someone to help you if the rod is too long for you to handle on your own.
Make sure to thread the curtains onto the rod before placing the rod in the brackets; threading them after can be very difficult.
Step 7 - Steam And Train The Folds
This is the finishing touch for your curtain installation. Steaming is very important after hanging curtains, as it helps to remove wrinkles and is also very hygienic. The steam penetrates the fabrics to lift dirt and odor, and to disinfect them. With our free Pre-washed services, you get relaxed, soft, chemical-free curtains that make the steaming step easier. This guide also shows you how to remove wrinkles from your curtain fabrics and steam them properly. You can also shape, draw, and close the curtains a few times to train the folds. With our memory training service, your curtains maintain every pleat and fold.

FAQs
- What about no-drill solutions like tension rods?
Tension rods are a temporary solution for lightweight, unlined curtains. They cannot support the weight of high-quality, lined drapes and will not achieve the 'high and wide' professional look taught in this guide. We only recommend a secure, permanent installation for a luxury result.
- How high is too high?
It is advisable not to exceed 2 inches from the ceiling/crown molding.
Install Your Curtains Easily
Whether you’re a DIY lover or you just want to guide the entire installation process, this guide spells out every step simply. You don’t have to be confused or worried. Also, with our various services, Three Girls holds your hand while you do it.
Leave a comment
All comments are moderated before being published.